conteúdo
Transferindo fotos de um PC para um iPad Deveria ser simples, mas o sistema de gerenciamento de arquivos da Apple pode tornar o processo confuso. Ao contrário dos dispositivos Android, o Explorador de Arquivos do Windows não consegue copiar fotos diretamente para a biblioteca de Fotos do iPad, porque o armazenamento do iPad não é exposto como uma unidade USB gravável.
Fortunately, there are several ways to transfer photos from a Windows PC to an iPad, including using Apple’s official tools, cloud services, and professional iPad transfer software.
This guide explains how to transfer photos from PC to iPad with or without iTunes and helps you choose the best method based on your needs.
| Forma | Mais Adequada Para | Need iTunes? | É necessária Internet? | Limitação Principal |
| Aiseesoft FoneEase | Transferência local rápida | Não | Não | Requer software de terceiros |
| Dispositivos Apple/iTunes | Official Apple sync | Sim | Não | Sync restrictions |
| iCloud Fotos | Usuários do ecossistema Apple | Não | Sim | Armazenamento gratuito limitado |
| Google Fotos | Acesso multiplataforma | Não | Sim | Photos remain in Google Photos until downloaded to the Photos app |
| Google Drive/Dopbox | Compartilhamento de arquivos | Não | Sim | Requires manually saving photos to the Photos app |
| algumas fotos | Não | Sim | Tamanho de fixação limitado; não adequado para grandes lotes. |
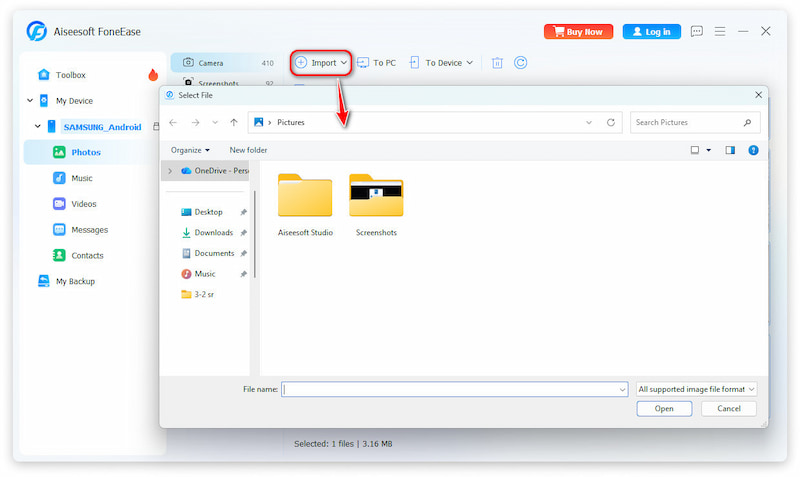
Aiseesoft FoneEase is a professional iOS data management tool that helps transfer photos between computers and iPhones/iPads without complicated syncing steps. Unlike iTunes, which requires syncing an entire photo folder, FoneEase lets you choose specific photos and transfer them directly to your iPad.
 100% seguro. Sem anúncios.
Apple provides official ways to transfer photos from a Windows PC to an iPad. Most Windows users can sync photos using iTunes, while iCloud for Windows provides wireless synchronization. Depending on your Windows version, you may also use Apple's newer device management apps for managing your iPad.
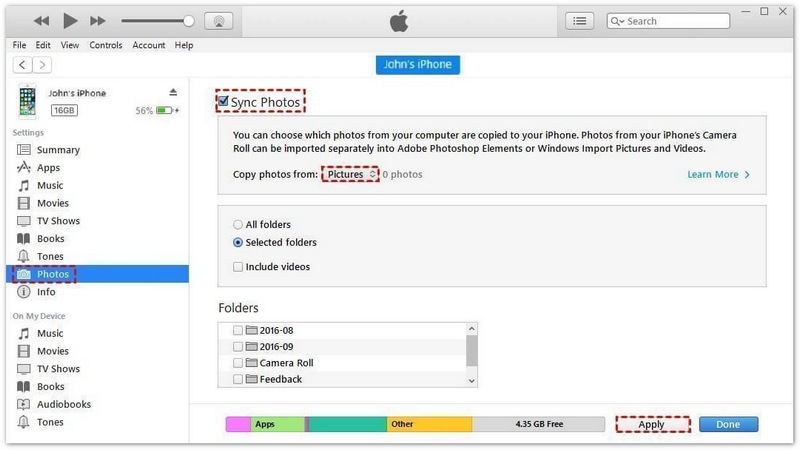
Limitações do Apple Photo Sync
Embora o método da Apple funcione, ele apresenta algumas restrições:
Este método é mais adequado para usuários que desejam a sincronização oficial da Apple em vez de uma transferência rápida de arquivos.
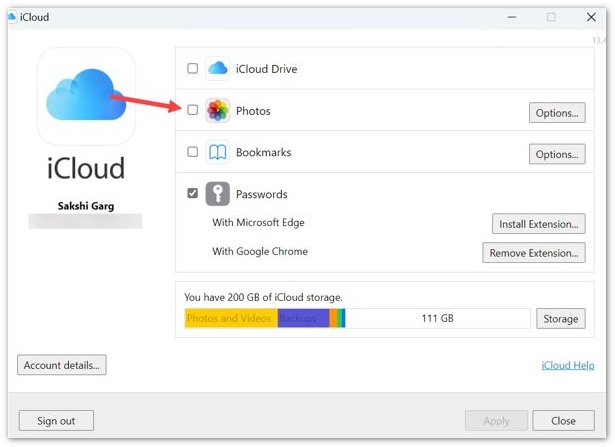
iCloud Photos is Apple's cloud-based solution for keeping photos available across Apple devices. It works well if you already use iCloud and want automatic photo synchronization.
No iPad:
No PC:
PRÓS
CONTRAS
Google Photos is useful for users who want access to pictures across different platforms. You can upload photos from your Windows PC and view them on your iPad through the Google Photos app.

Melhor para:
Limitações:
If you don't have a USB cable available, cloud storage services like Google Drive and Dropbox make it easy to transfer photos wirelessly. Simply upload the photos from your PC and download them on your iPad using the same account.
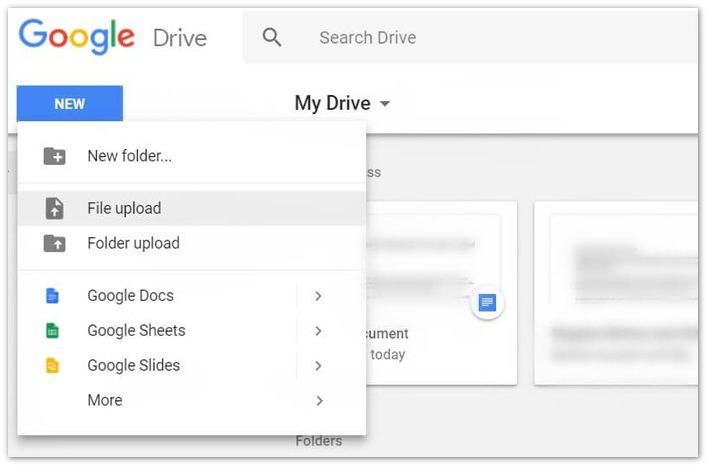
Esse método é conveniente para compartilhamento de arquivos, mas pode não ser a melhor opção se você quiser fotos diretamente no aplicativo Fotos da Apple.
If you only need to transfer a few photos, sending them to yourself by email is one of the quickest methods. Since most email services have attachment size limits, this method is best for a small number of images.
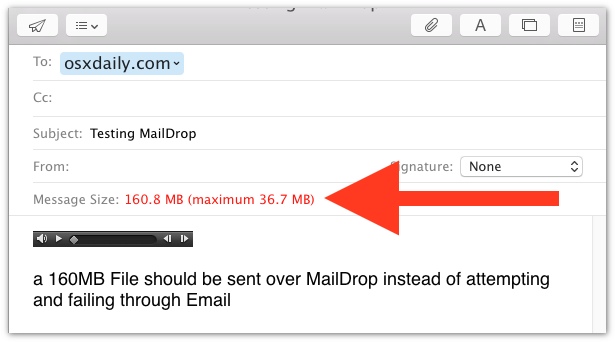
However, email is not recommended for large photo collections because most services limit attachment size. Most email providers limit attachments to around 20–25 MB per email. If your photos exceed the limit, compress them or use a dedicated iPad transfer tool ao invés.
Why Can't I Drag Photos from PC to iPad?
O Windows pode reconhecer seu iPad como um dispositivo de câmera, mas não permite copiar fotos diretamente para a biblioteca de Fotos do iPad. Use o app Dispositivos Apple, o iCloud ou uma ferramenta de transferência para iOS como o FoneEase.
100% seguro. Sem anúncios.
Why Does My iPad Not Show the Trust Prompt?
Experimente estas soluções:
Por que minhas fotos do iCloud não estão aparecendo no iPad?
Verifica:
Why Don't My Imported Photos Appear in the Photos App?
Possíveis razões incluem:
Posso transferir fotos do PC para o iPad sem usar o iTunes?
Sim. Você pode usar o Aiseesoft FoneEase, o iCloud Fotos, o Google Fotos ou serviços de armazenamento em nuvem para transferir fotos sem o iTunes. Para uma transferência local mais rápida, uma ferramenta de transferência para iOS via USB costuma ser mais prática.
Can I transfer photos from PC to iPad using a USB cable?
Uma conexão USB proporciona velocidades de transferência mais rápidas e não depende da velocidade da internet.
Why can't I copy photos directly to my iPad from Windows Explorer?
Apple does not treat iPad storage like a normal USB drive. File Explorer mainly supports importing photos from iPad to PC, not adding pictures into the iPad Photos library.
Qual é a maneira mais rápida de transferir fotos do PC para o iPad?
Para a maioria dos usuários do Windows, transferir fotos por meio de uma conexão USB com o Aiseesoft FoneEase é um dos métodos mais rápidos, pois evita o upload para a nuvem e as restrições de sincronização da Apple.
Conclusão
Existem muitas maneiras de transferir fotos do PC para o iPad, but the best method depends on whether you prefer speed, convenience, or official Apple solutions.
Apple's official solutions, such as iTunes and iCloud Photos, work well for users inside the Apple ecosystem, while Google Photos and cloud drives are useful for cross-platform access.
If you want a simple way to transfer selected photos from your computer to your iPad without iTunes or cloud limitations, Aiseesoft FoneEase provides a faster and more flexible solution.
100% seguro. Sem anúncios.
 Perda de qualidade de vídeo no Google Fotos: causas e como corrigir
Por que os vídeos do Google Fotos ficam desfocados? Descubra as causas, como problemas de compressão e sincronização, além de maneiras eficazes de corrigir e restaurar a qualidade do vídeo.
 O Google Fotos não está fazendo backup: como salvar e recuperar suas fotos
O Google Fotos não faz backup? Descubra por que isso acontece, como corrigir facilmente e como recuperar suas fotos com segurança usando a melhor ferramenta.
 Recupere fotos apagadas do iPad ou iPod touch com ou sem backup.
Quer saber como recuperar fotos apagadas no iPad ou iPod touch? Este guia apresenta métodos Passo a Passo para ajudá-lo a recuperar suas fotos perdidas com segurança, tenha você um backup ou não.

O Aiseesoft FoneEase é uma ferramenta de transferência e gerenciamento de dados que permite mover, fazer backup e gerenciar diversos dados entre iOS, Android e computadores de forma integrada, sem precisar redefinir o telefone ou usar o iTunes.
100% seguro. Sem anúncios.

*Campo obrigatório
*Por favor, insira um e-mail válido